3.1 Test object
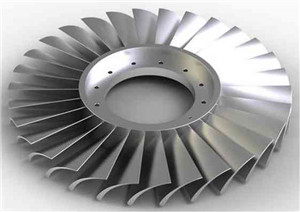
The test uses a certain type of aero engine titanium alloy integral disc, as shown in Figure 14. The precision milling process has been completed before the abrasive belt grinding.

Fig. 14 Ti-alloy integrated blisk for test
3.2 Test equipment
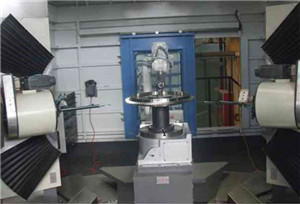
The test used an integrated blade disc CNC belt grinder specially developed for the efficient, precise and automatic grinding of the aeroengine integral blade surface. The machine tool is mainly composed of a new belt abrasive head, bed, high-precision rotating turntable and guide rail. The integrated blade disc CNC belt grinding machine is shown in Figure 15. The machine tool adopts a double grinding head grinding device to realize the rough clamping and fine grinding processing of the workpiece in one clamping, reduce the error caused by the clamping of the workpiece, and improve the processing accuracy. The contact wheels with different diameters and widths can be replaced according to different work requirements to avoid interference during processing. The contact wheel assembly adopts quick snap connection, which can be quickly replaced. The equipment adopts a new type of open belt grinding technology, which can realize the rapid replacement of the belt (time ≤5 s) to ensure that the surface quality and consistency of the workpiece meet the requirements.

Fig. 15 Belt grinding machine
CNC blade belt grinding of integral blade disc is a combination of CNC machine tool and new abrasive belt grinding technology to grind and polish the integral blade disc. During the grinding of the whole blade disc abrasive belt, the contact between the abrasive belt and the blade disc is easy to produce large flutter deformation, which will affect the surface quality and profile accuracy of the entire blade disc. Therefore, in order to improve the consistency of the overall blade disc surface accuracy and reduce the impact of abrasive belt wear on the machining quality of the blade disc, a new abrasive belt grinding method as shown in FIG. 1 is proposed.
The main equipment and instruments of the test also include a coordinate measuring machine, TR200 high-precision roughness meter, and field emission scanning electron microscope.
3.3 Test plan
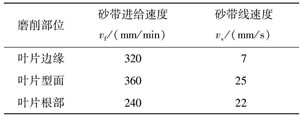
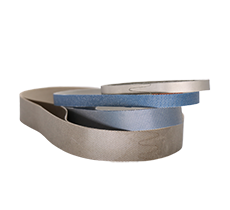
The experiment used three coordinate measuring machine, roughness meter, field emission scanning electron microscope, etc. to obtain the geometric dimensions, surface roughness and surface morphology of the blade disc before and after grinding. In the process of CNC abrasive belt grinding, a three-coordinate measuring machine is used to detect the entire blade disc surface, and the model is used to reconstruct the model to obtain the grinding allowance distribution; according to the divided grinding area, interference avoidance inspection and simulation are performed to optimize Grinding tool trajectory. According to the grinding characteristics of the titanium alloy material belt, after multiple grinding tests, it is determined that the silicon carbide grinding belt is used for grinding. Due to the different milling lines and machining allowances in the grinding areas of the entire blade disk, the feed speed and abrasive belt linear speed of the different grinding parts of the workpiece are also different, as shown in Table 1.
Tab. 1 Infeed speed and belt linear speed of belt grinding
 3.4 Analysis of test results
Select 4 blades evenly distributed on the whole leaf disk, numbered 1, 2, 3, 4 and measure the selected blade bottom (A1), middle part (A2), and blade tip part (A3) before and after abrasive belt grinding Sectional surface roughness and profile accuracy.
(1) Surface quality analysis of the whole leaf disc
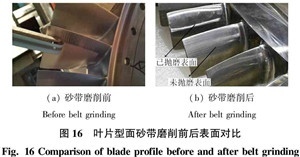
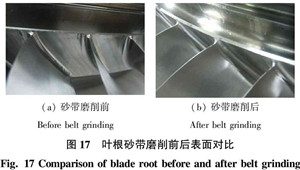
Figure 16 and Figure 17 show the comparison of the blade profile surface and the blade root surface of the whole blade disc before and after grinding. It can be seen from Figure 16 and Figure 17: After grinding with a new type of open-type CNC abrasive belt, the blade-shaped machining surface basically eliminates the milling tool marks and the tool joints in the transition area, and the surface has no adhesions, burns, scratches and other defects. , Good surface quality consistency.


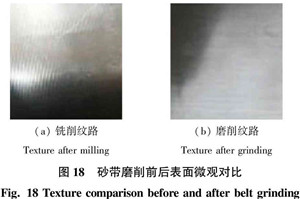
Enlarge the local area before and after blade grinding, as shown in Figure 18. It can be seen from Fig. 18: After the grinding of the CNC blade belt of the entire blade disc, a uniform and controllable grinding pattern is formed along the longitudinal direction of the blade, and the grinding pattern is fine and even, which is beneficial to improving the fatigue resistance of the entire blade disc.

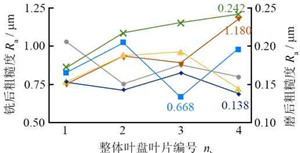
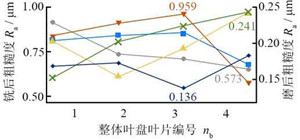
The surface roughness before and after belt grinding (BG) of the whole blade disc is shown in FIG. 19. It can be seen from Fig. 19 that after precision milling (FM), the surface roughness Ra of the integral leaf disc leaf surface is 0.668~1.180 μm, the surface roughness Ra of the leaf back surface is 0.573~0.959 μm, the surface is rough The degree of consistency is poor and cannot meet the requirements of design Ra0.4 μm. After grinding with CNC abrasive belt, the surface roughness Ra of the integral leaf disc leaf surface is 0.138~0.242 μm, and the surface roughness Ra of the blade back surface is 0.136~0.241 μm, which meets the design requirements.

- Surface roughness of blade pot

- Surface roughness of blade back

Fig. 19 Surface roughess analysis of blade on integrated
It can also be seen from Figure 19 that the surface roughness of the leaf surface of the leaf disc after grinding is smaller than the surface roughness of the back surface of the leaf, which is mainly due to the same contact pressure The larger contact area of the belt is helpful to reduce the surface roughness.
It can be obtained from the above analysis that this method meets the requirements of the surface roughness of the blade surface of the whole blade disc. This is mainly because during the grinding process of the abrasive belt, due to the flexible characteristics of the abrasive belt and the contact wheel, the abrasive belt and the workpiece exhibit surface contact under the action of the contact pressure, and at the same time, the abrasive belt and the workpiece contain broken grinding The particles and the cooling liquid form the effect of grinding and polishing, so that the entire blade disc has the dual functions of grinding and polishing in the process of abrasive belt grinding, so that a relatively low surface roughness can be obtained.
(2) Accuracy analysis of the overall blade disc profile
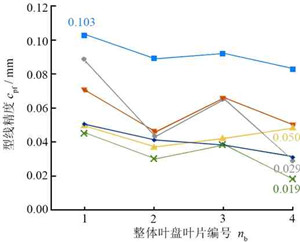
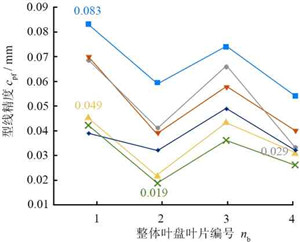
The accuracy of the profile before and after grinding the blade disc of the whole blade disc is shown in Figure 20. After precision milling of the whole blade disk, the blade leaf profile accuracy is 0.029~0.103 mm, and the blade back profile accuracy is 0.033~0.083 mm. After grinding, the accuracy of the contour of the whole leaf disc leaf pot is 0.019~0.050 mm, and the accuracy of the blade back contour is 0.019~0.049 mm. It can be seen from this that after the CNC abrasive belt grinding, the profile accuracy and consistency of the overall blade disc surface are significantly improved, basically meeting the design requirements (0.05 mm).Fig. 19 Surface roughess analysis of blade on integrated blisk

- Profile accuracy of blade pot

(b) Profile accuracy of blade back

Fig. 20 Profile accuracy analysis of blade on integrated blisk
It can also be seen from Figure 20 that the profile accuracy of the blade back after grinding is generally higher than that of the leaf pot, which is mainly due to the small contact area between the blade back and the abrasive belt during the processing process, which is beneficial to improve Profile accuracy; at the same time, it can be seen that the overall blade disc has a higher profile accuracy in the middle part, after fine milling is 0.039 ~ 0.050 mm, because although the blade deformation is considered in fine milling, it cannot adapt to the large blade front Deformation and small deformation of the rear end, and after grinding, there is no such situation as the difference in milling processing profile accuracy between different sections is large, so abrasive belt grinding has a greater advantage for adapting to blade deformation.

